
Hanging Picture Frames: Expert Guide for Australian Homes
You've just unloaded a stack of wrapped frames, the couch is half blocking the hallway, and the last thing you want is to put a fresh hole in a new wall and realise the frame's crooked. That's the core job of hanging picture frames after a move, getting the art from A to B in one piece, then fixing it to the right wall with the right hardware so it stays straight, safe, and looks right in the room.
Australian homes make that trickier than many expect. A Melbourne apartment might have plasterboard in one room, brick in the next, and a tenancy agreement that makes every hole feel like a debate. The good news is that a clean, repeatable method beats guesswork every time.
Essential Tools and Materials for Picture Hanging
The first mistake people make on moving day is trying to hang frames with whatever's already in the junk drawer. That works for a tiny print on a timber stud, maybe. It falls apart fast once you're dealing with different wall types, heavier frames, or a whole box of art that needs to go up before dinner.
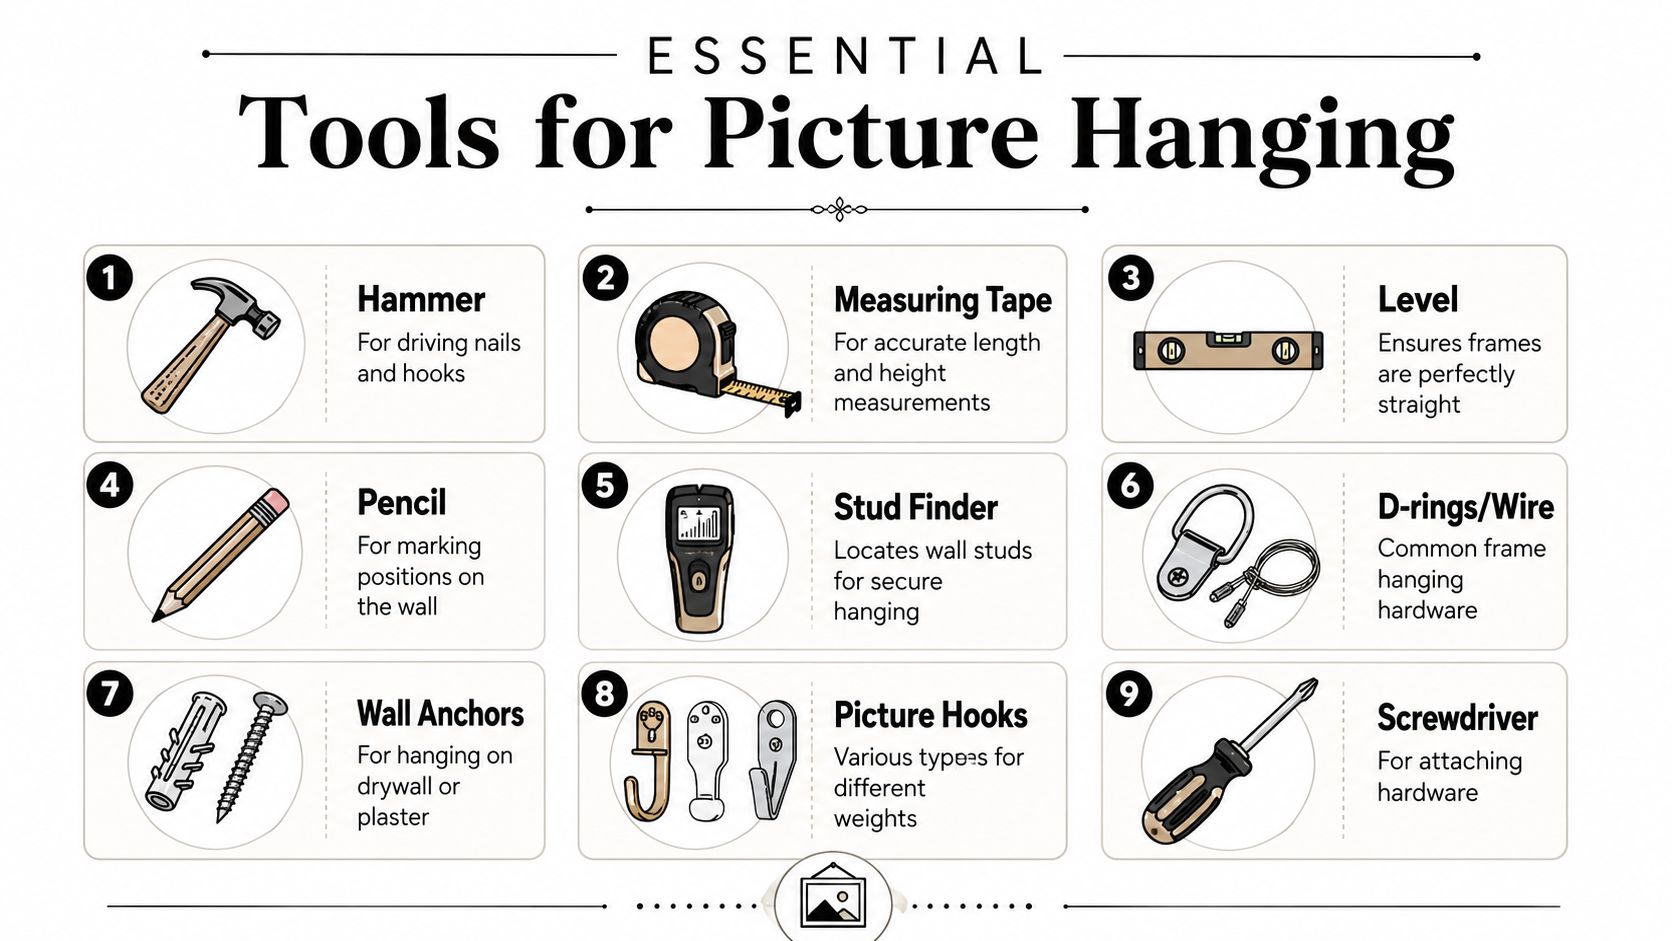
A proper kit for picture hanging should travel with you from move to move, because the same handful of tools keeps turning up in Melbourne homes. Keep the essentials together in one small tub so you're not hunting through boxes for a pencil or making a hardware run mid-job. If you're still packing, it helps to pair that kit with the right moving supplies and a few spare cartons from where to find moving boxes.
What actually belongs in the kit
Use tools that let you measure, mark, and secure the frame before you commit to a hole. The most useful items are straightforward.
- Hammer: For driving nails and light hooks into suitable walls.
- Measuring tape: For setting height and spacing accurately.
- Level: For checking alignment after the frame goes up.
- Pencil: For marks that are easy to adjust or erase.
- Stud finder: For locating timber where you can anchor securely.
- D-rings and wire: Common hanging hardware on the back of framed work.
- Wall anchors: For plasterboard or other hollow walls.
- Picture hooks: Different weights need different hook styles.
- Screwdriver: For attaching hardware properly, especially anchors and D-rings.
For size selection, it's smart to check practical framing advice before you buy, especially if you're matching posters or prints to a standard sheet size. A useful reference is the UK Quad and One Sheet sizing advice, which helps you avoid buying the wrong frame dimensions for a poster you intend to hang.
Practical rule: If you don't own a level, buy one before you buy more hooks. A frame that's slightly off is one of those problems you'll notice every single day.
The hardware matters just as much as the tools. Lightweight frames can sit happily on simple hooks, but anything larger needs a method that suits the wall, the frame weight, and the way the back of the frame is built. If you've just moved into a new place, that small portable kit saves time, avoids damage, and keeps the project from turning into a patch-and-paint job.
Measuring and Marking Techniques That Eliminate Guesswork
Most crooked frames aren't caused by bad taste, they're caused by bad geometry. If you guess where the hanger should go, you're not measuring the frame, you're guessing at the finished position. That's how a picture ends up higher than intended, lower than intended, or sitting a few millimetres off level in a way that your eye catches straight away.
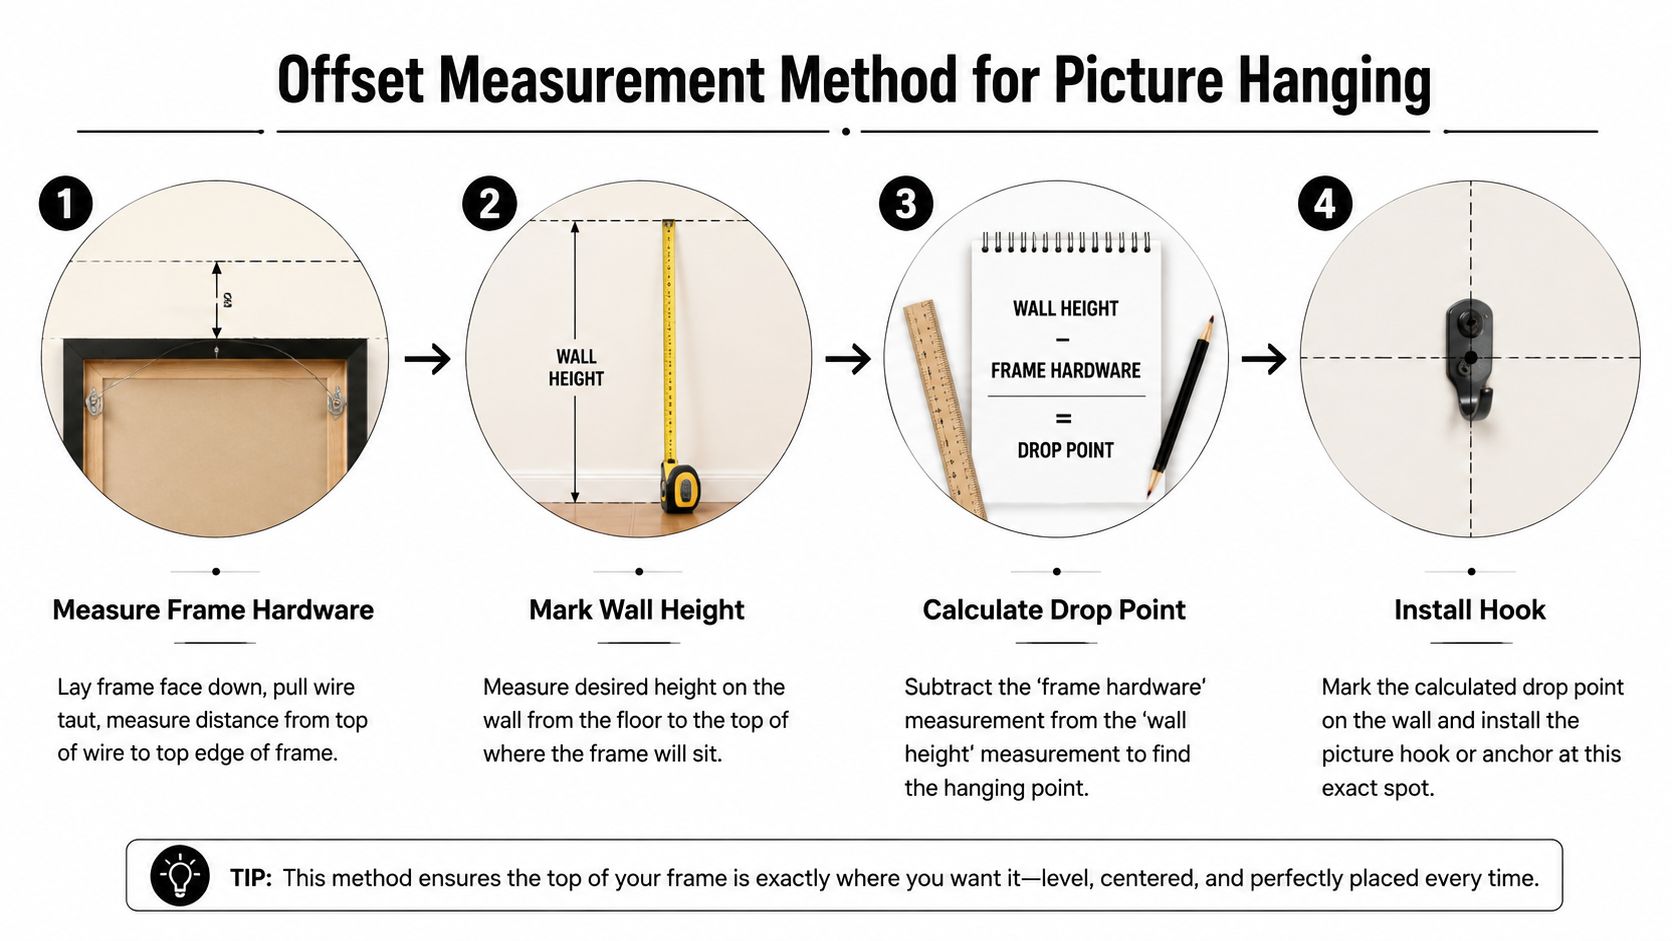
The cleaner method is to measure the frame hardware, then transfer that offset to the wall. Lay the frame face down, pull the wire taut if it has one, and measure from the top edge of the frame to the wire apex or the hanging point. Then mark the intended top-of-frame line on the wall, subtract the offset, and put your hook or screw exactly there. Australian picture-hanging guidance recommends this because it bases the wall anchor on the frame's actual hardware geometry, not on eye-balling.
The height target that keeps rooms looking balanced
A broadly used benchmark is to place the centre of the artwork around 150 to 160 cm from the floor, which aligns with the common 57 to 60 inch rule used in other markets. That's a good starting point for most rooms, but it's not a law. A low sofa, a tall hallway, or a room with very high ceilings can all justify shifting the placement slightly while keeping the overall grouping visually balanced.
The best habit is to mark once, check twice, and hang once. After the frame is on the wall, step back and check level before you walk away. That final check catches the small errors that show up only after the frame is loaded onto the hook and the wire settles.
Don't pull the wire too tight. A tight wire lifts the frame higher on the wall and makes the hanging point behave differently under load.
That same mistake shows up again and again in moving jobs. People place the hanger too high on the back of the frame, then wonder why the artwork sits above the intended line. A little slack in the wire, or the correct ring position for D-rings, gives you a more predictable result and makes gallery walls far easier to plan.
If you're organising a move and want the new place sorted in one pass, the same precision mindset helps with unpacking too. A simple moving into a new house checklist keeps the art box from becoming the last thing you deal with.
Choosing the Right Wall Anchors for Australian Homes
Australian walls aren't one-size-fits-all, and the fixings shouldn't be either. A timber stud gives you a very different result from plasterboard, and brick or concrete needs a different approach again. The safest habit is to match the fixing to both the wall material and the frame weight, then leave yourself a margin instead of trusting a label alone.
For heavier or more valuable framed art, the best practice is to choose hardware rated above the expected load. Independent hanging guidance recommends hardware rated at least 1.5 times the actual frame weight. That margin matters because hanging isn't static, the load shifts when the frame is lifted, the wire settles, and the frame finds its final resting point.
How wall type changes the fixing
Plasterboard is common in newer interiors and many apartment walls. If you can find a stud, that's the strongest option, because the screw goes into timber rather than relying on the board alone. Brick and concrete need masonry-compatible fixings, while old plaster often needs more careful drilling and better-quality anchors to avoid crumbling around the hole.
Heavy mirrors and large framed works deserve stronger hardware than a lightweight print. Toggle-style anchors and other load-bearing fixings are more suitable when the wall can't offer a stud, but even then the wall type still sets the limit. Skipping stud verification is one of the most expensive mistakes because it turns a solid installation into an avoidable repair.
| Wall Anchor Selection Guide | Plasterboard Anchor | Brick/Concrete Anchor | Timber Stud |
|---|---|---|---|
| Light frame | Small picture hook or light-duty anchor | Lightweight masonry fixing | Screw into stud |
| Medium frame | Quality plasterboard anchor with margin | Masonry plug and screw | Screw into stud |
| Heavier frame | Load-rated anchor, only if no stud is available | Heavy-duty masonry fixing | Direct screw into stud |
| Very heavy or valuable piece | Best avoided unless hardware and wall assessment are suitable | Use high-rated masonry hardware | Direct screw into stud with suitable hanger |
A shallow wire V is safer than a steep one for wire-hung frames because it spreads the load better and reduces vertical lift at the hanger point. That's one of those details that looks small on the bench but matters once the frame is on the wall. The rule is simple, if the wall can take the load cleanly into a stud, use the stud.
Renter-Friendly Hanging Options That Protect Your Bond
Renter-friendly hanging is a practical issue in Australia, not a niche decorating trick. With around 31% of Australian households renting in the 2021 Census, damage-free methods matter to a lot of people, especially in apartments where wall repairs can become part of the exit inspection. The right choice depends on the frame weight, the wall surface, and how long the piece needs to stay up.
Light frames can often go up with adhesive strips, putty, Velcro systems, or removable hooks. Heavier frames still need proper hardware, even if that means using a small, tidy hole that can be patched later. If you're deciding between methods, think about the bond risk, the length of time the artwork will stay mounted, and how often you expect to move it.
What works best for which kind of frame
Adhesive strips are the most common damage-free choice for light to medium frames on smooth, suitable walls. Mounting putty or tack works best for very light items like posters or small photos, not for anything with real mass. Removable hooks sit somewhere in the middle, but the adhesive backing still depends on clean application and an appropriate wall surface.
Velcro systems are useful when a frame needs repositioning or extra security against small knocks. They can be a good fit for framed photos in living areas where you want flexibility without drilling, but they're still not a substitute for proper fixings on heavier work. Melbourne humidity can make any adhesive method less predictable, so clean the wall properly, test a small area first, and avoid assuming the product will behave the same in every room.
If a frame is heavy enough to damage the wall when it falls, it's heavy enough to deserve proper fixings.
That's the honest line. Renter-friendly options solve a real problem, but they're not universal. On plasterboard, for example, a lightweight frame can stay up neatly with a removable system, while a substantial piece needs the same care you'd use in a owned home.
If you're moving into an apartment and trying to plan wall layouts before furniture arrives, the same logic applies to the rest of the space too. A how to plan for an apartment move checklist helps you sort what goes where before the boxes disappear into the wrong room.
Creating Gallery Walls with Professional Spacing
A gallery wall goes wrong when each frame is treated as its own little project. The layout has to work as one unit, especially in a hallway, above a sofa, or on a big blank wall that needs structure. That's why paper templates are still the cleanest way to plan the wall before any hole is drilled.
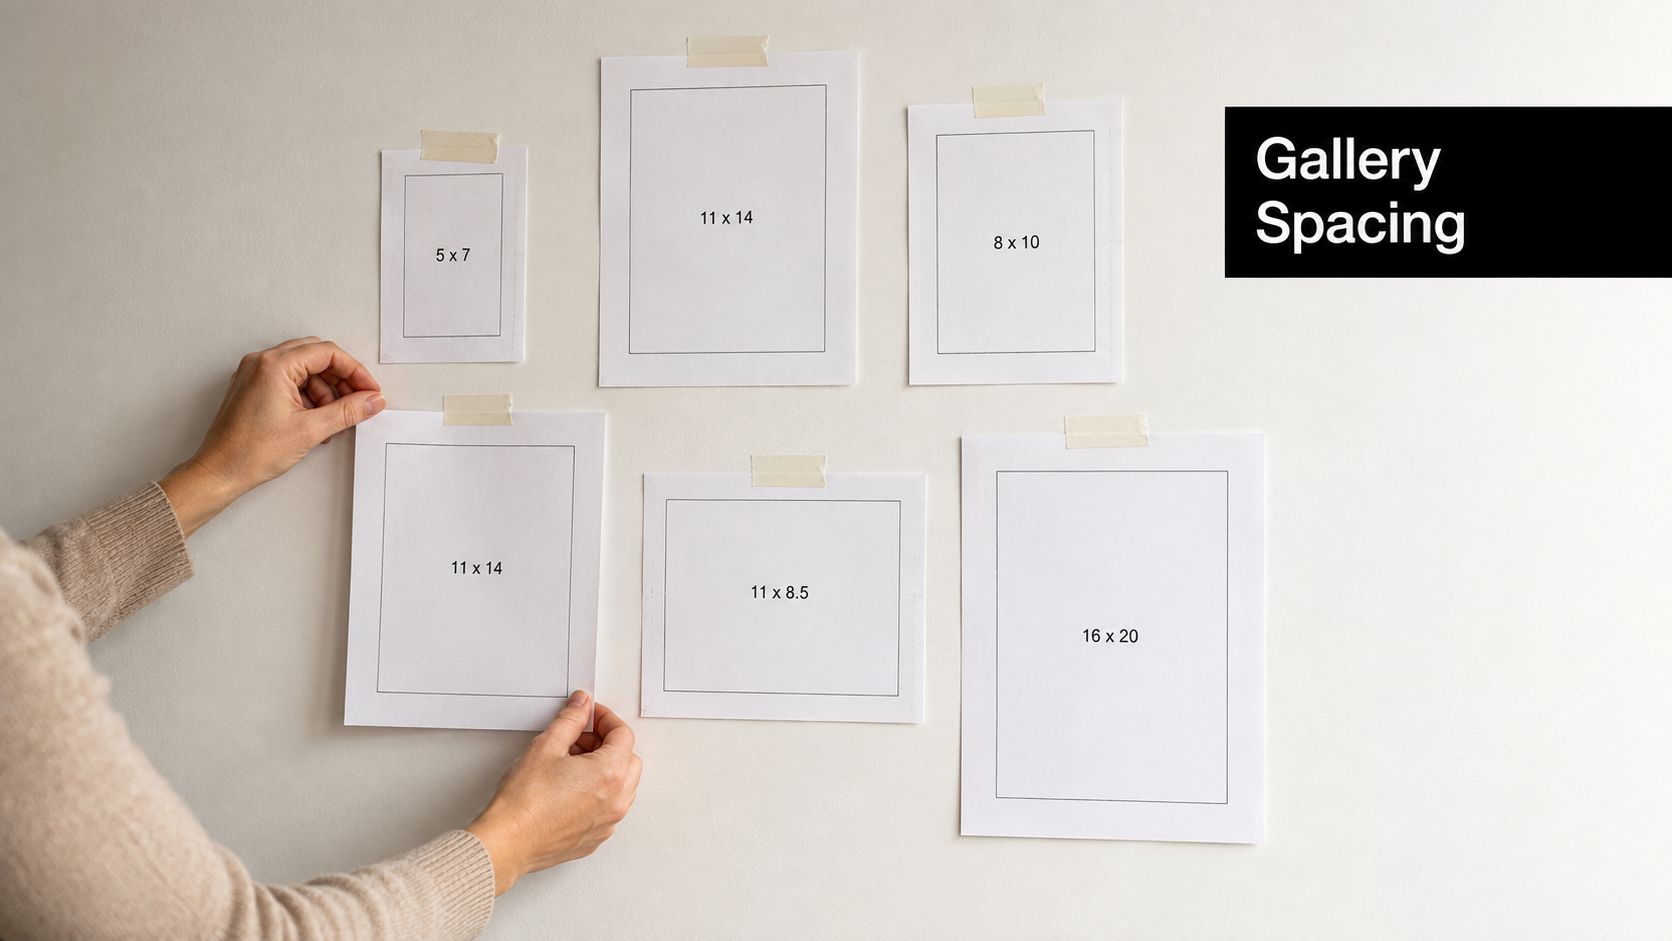
Cut full-size paper templates for each frame, label them, and tape them to the wall. Move them around until the spacing feels balanced, then check the overall shape from a few steps back. For a grouped display, the centre of the composition still wants to sit roughly in the 145 to 150 cm range from the floor, even when the frames themselves vary in size.
The details that make the layout feel deliberate
Keep the gaps consistent enough that the display reads as one composition, not a bunch of separate holes. Mixed orientations are fine, but they need a visual rhythm, not random placement. A larger frame can anchor the collection, while smaller pieces help it turn the corner, bridge a gap, or soften the edge near a doorway.
Above a sofa, the bottom edge of the whole arrangement should relate to the furniture, not float aimlessly above it. On a staircase, the templates let you follow the line of the rise without committing to a crooked trail of hooks. In a hallway, the paper stage is what saves you from drilling, patching, and then drilling again.
For a practical style reference while planning mixed frames and finishes, the modern farmhouse wall decor ideas resource shows how grouped pieces can still feel coherent without matching perfectly. That's useful when your frames came from different places, different years, or different rooms after a move.
Treat the gallery wall as one shape, not a row of individual frames.
That approach cuts rework because you're judging the wall before you commit to the wall. If the templates feel awkward, the finished holes will feel awkward too. When the paper layout looks right, the drilled version usually follows with far less drama.
For a moving day cleanup of what's left after the hang, decluttering helps too. A how to declutter before you move guide can stop you dragging frames you never plan to display into the new place.
Protecting Frames During Moves and Choosing Safe Locations
A frame can survive the move and still end up in the wrong spot. That's the part people miss. Transport knocks, sunlight, moisture, and heat all affect how long the artwork stays clean, flat, and worth hanging where you've chosen to put it.
I've seen plenty of moves where the frame arrived intact, but the corner dings told the story of a rushed truck load or poor packing. The safest approach is boring in the best way, corner protectors, padded wrapping, and a box that can't let the frame shift around. For fragile items, the packing method matters as much as the lift, and a good reference on how to pack fragile items for moving helps explain why frames need steady support before they ever reach a wall. It also helps to protect shipments with foam edge protectors when the frame's edges need more care than the face.
Where frames should and shouldn't go
Sunlight fades prints and photos over time, so bright windows are not the best long-term spot for valuable work. Heat sources can distort frames or stress the backing, and damp walls are a bad idea for anything you care about. External walls can also carry more moisture risk, so the safer position is often an internal wall with steadier conditions.
That trade-off matters more in Australia than in many cooler climates. The best-looking wall is not always the best-preserved wall, and for photographs, prints, and artworks, durability can beat perfect symmetry. If a room gets strong light in the afternoon, use that room for something less sensitive, or spend more on UV glazing and archival backing where the piece deserves it.
A simple moving example makes the point. A family shifts from a Brunswick house into a newer apartment, and the same framed print that looked fine in the old dining room now sits opposite a bright western window. The image is still level, but the placement is wrong for the room, because the display spot now carries more exposure risk than it did before.
For large collections, valuable originals, or awkward oversized pieces, professional art handling is worth it because transport and installation are two parts of the same job. The frame needs to arrive without movement, then go onto a wall that suits the environment as well as the style. That's the sweet spot, safe in transit, safe on the wall, and sensible for the room.
If you're planning a move in Melbourne and want your framed art packed, transported, and set up with less stress, Get n Go Removals Melbourne can help with the careful handling that picture frames demand. They're built for moves where timing, protection, and clean placement matter, so your frames don't just arrive, they're ready to hang properly in the new place.